Adidas Adizero Takumi Sen 11 vs Adidas Adizero Takumi Sen 10
Last updated 2026-10-28 · the comparison recomputes itself when either shoe’s data changes
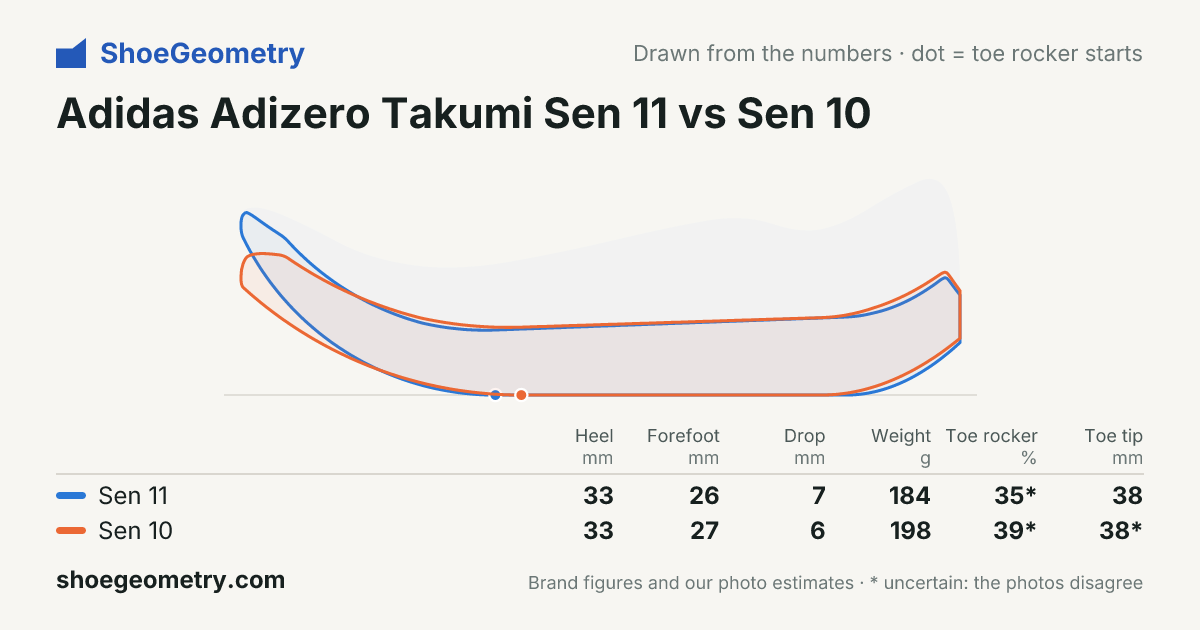
What changed from the Adidas Adizero Takumi Sen 10: weight lighter, rocker rise angle steeper, toe rocker shorter. Each cell carries a provenance badge; open a shoe for sources.
- Adidas Adizero Takumi Sen 1133/26 mm · toe rocker 35 % · heel bevel 9 %
- Adidas Adizero Takumi Sen 1033/27 mm · toe rocker 39 % · heel bevel 11 %
What changed
| Measure | Adidas Adizero Takumi Sen 10 | Adidas Adizero Takumi Sen 11 | Change |
|---|---|---|---|
| Heel stack | 33 mm | 33 mm | about the same |
| Forefoot stack | 27 mm | 26 mm | lower (−1 mm) |
| Drop | 6 mm | 7 mm | more (+1 mm) |
| Weight | 198 g | 184 g | lighter (−14 g) |
| Toe rocker | 39% of length | 35.4% of length | shorter (−3.6 %) |
| Toe tip over ground | 37.8 mm | 38 mm | about the same |
| Rocker rise angle | 24.4° | 29.1° | steeper (+4.8) |
| Stiffness | 43/100 | 44/100 | about the same |
| Firmness | 36/100 | 32/100 | about the same |
| Forefoot base width | 110.3 mm | 112.5 mm | about the same |
| Foam | Lightstrike Pro (two layers) | Lightstrike Pro | naming difference: same foam, described differently by the sources |
Compared with the previous version in this catalogue. Differences within measurement noise are shown as about the same. All version changes
Which suits you
| If you want | Pick | Because |
|---|---|---|
| A smoother roll at toe-off | Adidas Adizero Takumi Sen 10 | 35.4 vs 39 % toe rocker |
| More cushioning under the heel | About the same | 33 vs 33 mm heel stack |
| More under the forefoot | About the same | 26 vs 27 mm forefoot stack |
| A lower drop | Adidas Adizero Takumi Sen 10 | 7 vs 6 mm drop |
| A stiffer, snappier forefoot | About the same | 44 vs 43 /100 stiffness |
| A firmer, more stable feel | About the same | 32 vs 36 /100 firmness |
| A wider base under the forefoot | About the same | 112.5 vs 110.3 mm forefoot base |
| Less weight | Adidas Adizero Takumi Sen 11 | 184 vs 198 g |
From the values below, with differences inside measurement noise shown as about the same. This describes the shoes, not what is right for your feet; comfort in the first few runs decides.
| Metric | Adidas Adizero Takumi Sen 11 Racing · Road | Adidas Adizero Takumi Sen 10 Racing · Road |
|---|---|---|
| Heel-to-toe drop | 7 mmStated | 6 mmStated |
| Heel-to-toe drop (lab) | 6.9 mmMeasured | 7.8 mmMeasured |
| Heel stack | 33 mmStated | 33 mmStated |
| Heel stack (lab) | 30.6 mmMeasured | 30.6 mmMeasured |
| Forefoot stack | 26 mmStated | 27 mmStated |
| Forefoot stack (lab) | 23.7 mmMeasured | 22.8 mmMeasured |
| Weight | 184 gStated | 198 gStated |
| Toe rocker | 35 %*est. | 39 %*est. |
| Rocker radius | 39 %est. | 57 %est. |
| Rocker rise angle | 29 degest. | 24 deg*est. |
| Rocker angle at toe | 64 degest. | 55 degest. |
| Toe tip over ground | 38 mmest. | 38 mm*est. |
| Visible rocker lift onset | 73.8 %est. | 74 %est. |
| Toe spring (relative) | 19.6 %est. | 17.1 %est. |
| Heel bevel length | 8.7 %*est. | 10.9 %*est. |
| Heel bevel height | 17 mmest. | 19 mmest. |
| Midsole width (forefoot) | 112.5 mmMeasured | 110.3 mmMeasured |
| Midsole width (heel) | 72.6 mmMeasured | 75.8 mmMeasured |
| Toe box shape | 73 %est. | — |
| Interior forefoot width | 93.4 mmMeasured | — |
| Toebox width | 71.4 mmMeasured | — |
| Longitudinal stiffness | 44Derived | 43Derived |
| Midsole firmness | 32Derived | 36Derived |
| Plate | Plate unknown | Plate unknown |
| Primary foam | Lightstrike Pro | Lightstrike Pro (two layers) |
| List price | $180 | $180 |
Key differences
- Adidas Adizero Takumi Sen 11's heel-to-toe drop is 7 mm, 1 mm higher than Adidas Adizero Takumi Sen 10's 6 mm.
- Heel stack is about the same: 33 mm for Adidas Adizero Takumi Sen 11, 33 mm for Adidas Adizero Takumi Sen 10.
- Adidas Adizero Takumi Sen 11's forefoot stack is 26 mm, 1 mm thinner than Adidas Adizero Takumi Sen 10's 27 mm.
- Adidas Adizero Takumi Sen 11's weight is 184 g, 14 g lighter than Adidas Adizero Takumi Sen 10's 198 g.
- Adidas Adizero Takumi Sen 11's toe rocker is 35 % of length, 4 % of length shorter than Adidas Adizero Takumi Sen 10's 39 % of length.
More comparisons
Read more about both shoes
We measure the shape. For how they feel over many miles, and for lab tests of cushioning, grip and fit:
Adidas Adizero Takumi Sen 10
- RunRepeat · lab test
Independent sites; we are not affiliated with them.
Share or embed
Embed on your site, blog or forum
Image with a link back:
<a href="https://shoegeometry.com/compare/adidas-adizero-takumi-sen-11-vs-adidas-adizero-takumi-sen-10"><img src="https://shoegeometry.com/compare/adidas-adizero-takumi-sen-11-vs-adidas-adizero-takumi-sen-10/share.png" alt="Adidas Adizero Takumi Sen 11 vs Adidas Adizero Takumi Sen 10: running-shoe geometry (ShoeGeometry)" width="600" height="315" style="max-width:100%;height:auto"></a>
Live embed (updates when we measure more):
<iframe src="https://shoegeometry.com/embed/compare/adidas-adizero-takumi-sen-11-vs-adidas-adizero-takumi-sen-10" title="Adidas Adizero Takumi Sen 11 vs Adidas Adizero Takumi Sen 10 (ShoeGeometry)" width="100%" height="580" style="border:0;max-width:640px" loading="lazy"></iframe> <p><a href="https://shoegeometry.com/compare/adidas-adizero-takumi-sen-11-vs-adidas-adizero-takumi-sen-10">Adidas Adizero Takumi Sen 11 vs Adidas Adizero Takumi Sen 10</a>: running-shoe geometry from ShoeGeometry</p>
Free to use with the link back (CC BY 4.0). Lab measurements are credited to the lab that made them.